How to make Lip Balm with Essential Oils

How to make Homemade Lip Balm with Essential Oils

I am still using essential oils. I have been doing a ton of research on essential oil and will be sharing what I have learned in an upcoming post.

I have been exploring a few more suppliers and been reviewing many aromatherapy educational websites and will be writing some posts on those too.

Today I am excited to share some of my favorite aromatherapy recipes. And some great sites to get more recipes to try.

I of course have to change things around to make recipes my own or adapt to the ingredients I have on hand.
It seems I can never follow a recipe exactly I always have to tweak it or embellish it making it my own.

The basic recipe for making Lip Balm in a tube is….

2 part solid natural “butter” ( like coco butter or shea butter)
2 parts liquid cold pressed vegetable oil (sweet almond oil, jojoba oil, sunflower oil, olive oil, etc.)
1 part plus 1/3 bees wax
10-15  drops essential oil depending on strength (peppermint use 1/2 that amount) for every 8 tubes

Some say a 3 parts carrier oil (vegetable oils) to 1 part beeswax and as much butters as you wish because they are already solid at room temperature. Usually 1 part.  As in butters I mean Shea butter or Cocoa Butter.
Another source said to use a 4 part butter and oils to 2 part bees wax. This works too. If your concoction is just too soft ad a little more beeswax. Maybe for lips you want it stiffer so it doesn’t go on too heavy but for your elbows and heels you want it softer.
I was super happy with the weight of mine for both applications.

In other words if that all is too much math here is my recipe:
Lemon Peppermint Lip Balm
1 Tablespoon  Coconut oil
1 Tablespoon Cocoa Butter
2 Tablespoon Sweet Almond Oil
1 Tablespoon plus 1 teaspoon grated Bees Wax
10 drops of lemon essential oil
optional plus 4 drops of peppermint essential oil
Fills 8 tubes (it filled 7 tubes for me with a little extra maybe I filled them too much and should have evenly distributed it among the 8.

I am always heavy handed on the scent factor you may want to reduce the amount of essential oil used.
10 total drops is plenty.

I wanted a small recipe to try to make sure I liked the consistency. This was perfect for the .15 oz tubes you can purchase here at Majestic Mountain Sage

Bees Wax pellets from Bulk Apothecary measured in microwave safe plastic measuring cup. (2 cup size)
In hindsight I now make this recipe in glass mixing cup as the glass heats up a little and does not make the wax cool as you pour it. (you will see this in the later pictures below)

Coconut oil I just purchased at Wal-Mart probably not best price but I did not have to pay shipping on it.

Raw Natural Cocoa Butter from Bulk Apothecary.

Sweet Almond Oil (liquid) from Bulk Apothecary.
1 Tablespoon plus 1 teaspoon and 1  Tablespoon of Coconut oil measured in container.

1 Tablespoon of Sweet Almond oil added.

Now here is a difference between my recipe and most of the others you find on the internet. Most tell you to melt in a double boiler or set the glass cup or bowl in a pan of boiling water on the stove. Well I figured my new microwave has a bunch of settings including melt. So I melted my ingredients in the microwave on melt.

However not much happened the coconut oil melted but the bees wax was slow to melt. So I just melted it on regular speed in my microwave a minute at a time watching until the bees wax got smaller and smaller and finally melted.

Then I added the Essential Oils. My mixture of wax and oils were barely melted so my oils were not going to instantly evaporate like they would in a really hot mixture. You probably will loose a little to evaporation just breathe it in and gain the therapeutic essence of the oils.

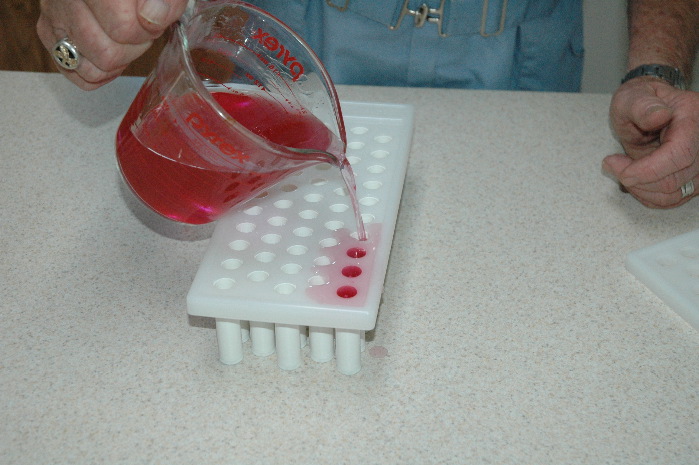
I placed the tubes in a small Rubbermaid container. Remember I was doing a small batch.
Next time I will order one of these great tube holder from Majestic Mountain Sage.
DSC_0261.JPG click on picture for manufactures directions.

In the meantime here is how I did it…

When I started pouring they immediately started to solidify. I could not grab the camera fast enough and it was inches away.
It was pretty hot outside that day so the air conditioning was running and my kitchen was pretty cool.

You can see how during the pouring it just solidified on the side of the container because the plastic was cool.

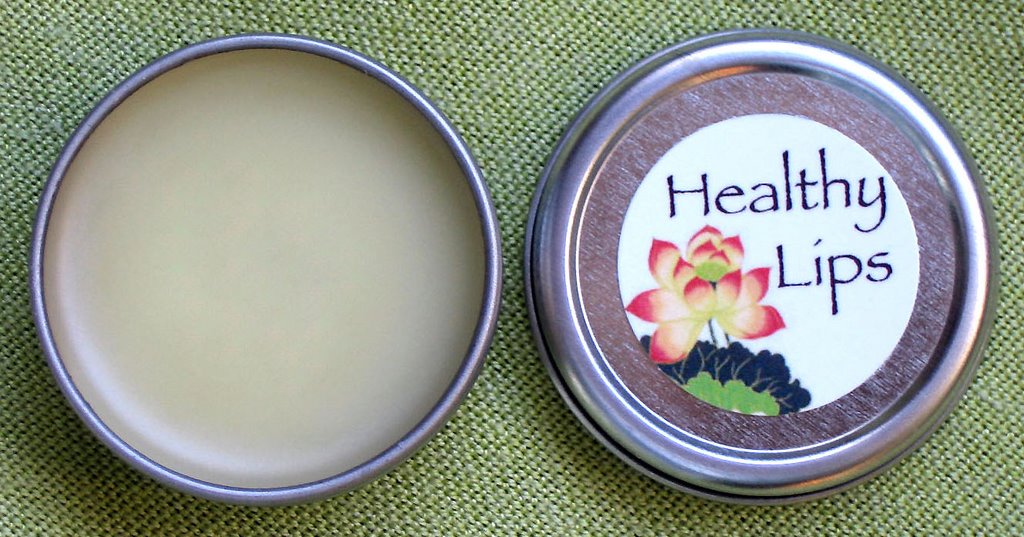
I did have to remelt it in the end to get the last little bit out. I ended up with not enough to fill the 8th tube. So I put it in my glass measuring cup and made another batch to make elbow and heel suave which is basically the same recipe just poured into a little tin.

Tin Flat Container 2oz w/ Cover

I ordered these from Specialty Bottle Company. 

See how partway through I had to remelt.

Finished pouring but not completely set up yet.

Finished product. I tried topping some of them off notice that did not really work. the little lump sometimes came off on your lip. Not all of them though. It was just too cool in my kitchen the day I made these.
But otherwise they really turned out wonderfully. The smell so yummy and feel like silk on your lips.
I made a lemon batch and then a lemon peppermint batch.

Here are some links to some other great recipes for lip balm….
Click on picture to go to some great lip balm recipes
Yummy Homemade Lip Balm

http://photos1.blogger.com/blogger/3878/2497/1600/LipBalm.jpg

Interestingly here is a recipe that is almost 1 part Bees Wax plus 1.25 part liquid oil. Makes a small enough amount to try. Click on the picture above to go to the recipe.

TIPNUT

This above link has a bunch of links to other recipes. But what really caught my attention was the chocolate recipe at the bottom of the page.
Hope you enjoy making some lip balm. Next post is Body Butter.
It melts upon skin contact. Gotta love it.
Thanks for reading
Make a comment!!!!
Join my blog!!!!
Love,
Lisa

How to Make a Scrabble Magnet Message Board

I was inspired by Twice Remembered Cottage’s Magnet Board which I first saw on Pinterest. We love to play Scrabble around here well let me say I love to play scrabble. 
It is hard to get others to play with me and super hard to play last few years with my barely three year old around who likes to upset the game when we are well into it. 
I thought this board would be perfect to hang on the wall where DS age 3 could not reach it and where we could have a perpetual game going all the time. I ended up having to limit each person to one word a day. 

I put a twist on mine by decoupaging a scanned scrabble board to the front so we could play an ongoing game. 
First I purchased the Sheet Metal from Lowe’s. It was about $12. Online it says it is $8.94. But at our Lowe’s I know it was more than that.  
And we just got door frame molding and little corner wood rosettes so we did not have to do miter cuts. We have a miter saw and can certainly do miter cuts but this was easier and cleaner edges. The molding was already primed white. 

First we glued with Liquid Nails the metal to a piece of Masonite we already had. Personally next time I would use 1/2″ plywood because it warped a little. 
  after putting the glue on my DH put a bunch of heavy objects from the garage on top of it and let it dry overnight. 

Next I selected pages from a 1920’s Dictionary I just knew I was saving for a great project!!!


 Then I Decoupaged them to the sheet metal. 
  Okay note here I am not the best decoupager (is that a word?)
I always have bumps and bubbles this process took forever to get the worst of the bubbles out. I especially have this problem when I decoupage with antique papers. They have a tendency to absorb the glue and tear super easy and then ripple as they dry. It is really difficult. Most of the time when I use actual vintage papers I coat them with decoupage and let them dry because then the tend to tear less. However these were super thin pages and I did not want to wait. So I spent what seemed to be hours smoothing re-smoothing carefully without tearing. And it still was a little bumpy and had a few bubbles. My remedy for that is several coats of varnish. It just added charm to it. You can tell it is real vintage paper. 


You can see in the Dictionary picture above that I painted the trim molding with black acrylic craft paint. then I distressed a little with sandpaper to let a little of the white show though. Then I varnished it with the same sparkly varnish I will tell you about below. So this molding was liquid nails glued onto the board and clamped overnight. 

Then came the hardest part to get the Scrabble board on the board so the Magnets would still stick. 

My scanner is legal size so I had to scan and rescan I even cut a board up and scanned it to get rid of any shadow and distortion. I did Photoshop the images a little cuz my 1945 board was more grey than I liked.  I then cut scanned images up and pieced them back together like a puzzle. 
Now the dictionary pages had a good 2 coats of decoupage and varnish on them you can see the shine in the picture. So I was able to put the board on and if I didn’t like it after it before it dried completely I could peel it of and start over. I did this a few times till I got it how I wanted it. 
You really cannot see the seams on the finished board. A little Tim Holtz antiquing stamp rubbed on it and coats and coats of varnish and it is all great. 
Below is the Sparkle Varnish from Micheal’s I love this stuff. I am not sure the camera does it justice. It is subtle. I use it on everything. It does not give a great shinny protective coat so I usually use Minwax acyclic gloss coat over it. 


Well that is it here’s the finished board.

Right now it is just leaned against the wall and propped up on top of my decoupaged desk, sometime I may just screw it directly to the wall. 

Well hope this helped you if you want to make your own. Feel free to comment or question. 

Also I will share my scans for you if you want to make one. 

so check back. 
  a few tricks… I sprayed the scanned image with an art fixative before decoupaging it. Helped it from smearing when I was smoothing the bubbles out. Still had issues with the pink bleeding. Clear spray varnish (cheap stuff) worked better. 

When gluing the Earth Magnets on the “craft” super glue was a little runny it worked but the magnets are super strong and hard to work with if the tiles were close together they would “jump” together or drift to the corners of the tiles. I preferred the Gel glue. 

I got the earth magnets from eBay. I ended up getting the 1/4″ x 1/16″ rare earth magnets.

Here are the first set of scrabble board scans…
Page 1
 Page 2 
Page 3
Page 4

Happy Crafting and Decorating
Love,
Lisa